Besides on the Vivie, I also did a re-test for the Upton from
Blaverry. The Upton is a jersey dress with a color blocked front and a
back pleat on the back. Both the split front and back pleated back are
perfect to experiment with different fabrics. Due to the pleat the dress is very roomy and has a high playability and the dress sews up very quick.
Naast
de Vivie jurk, deed ik ook mee aan het hertesten van de Upton jurk van
Blaverry. De Upton is een tricot jurkje met een gesplitst voorpand en
een plooi op de achterkant. Door de twee delen in het voorpand en de
plooi is de jurk perfect om verschillende stoffen te combineren. Door de
plooi is de jurk heerlijk ruim en kan er heel goed in gespeeld worden en hij zit snel in elkaar.
I bought
the main fabric over a year ago at Stoffenelf. It was in the period
that I totally went for animal photo prints. I had stayed away
from them for a while, but then finally did fall head over heals. As can
be expected, I kind of jumped on the next fabric trend, and this cute
fabric just stayed on my pile. I think the colors are perfect for fall,
and I really love how it looks with the mustard yellow.
Ik kocht
de stof met giraffen en herten erop bij Stoffenelf, maar dan een jaar
geleden. In die periode was ik helemaal weg van dit soort foto prints.
Ik was wat sceptisch in eerste instantie, maar toen was ik er helemaal
weg van en kocht verschillende meters van allerlei dieren. Natuurlijk
werd mijn aandacht vervolgens weer door andere printjes getrokken, dus
dit juweeltje bleef in de kast liggen. Nu in combinatie met oker geel
vind ik het echter een super leuk herfst jurkje.
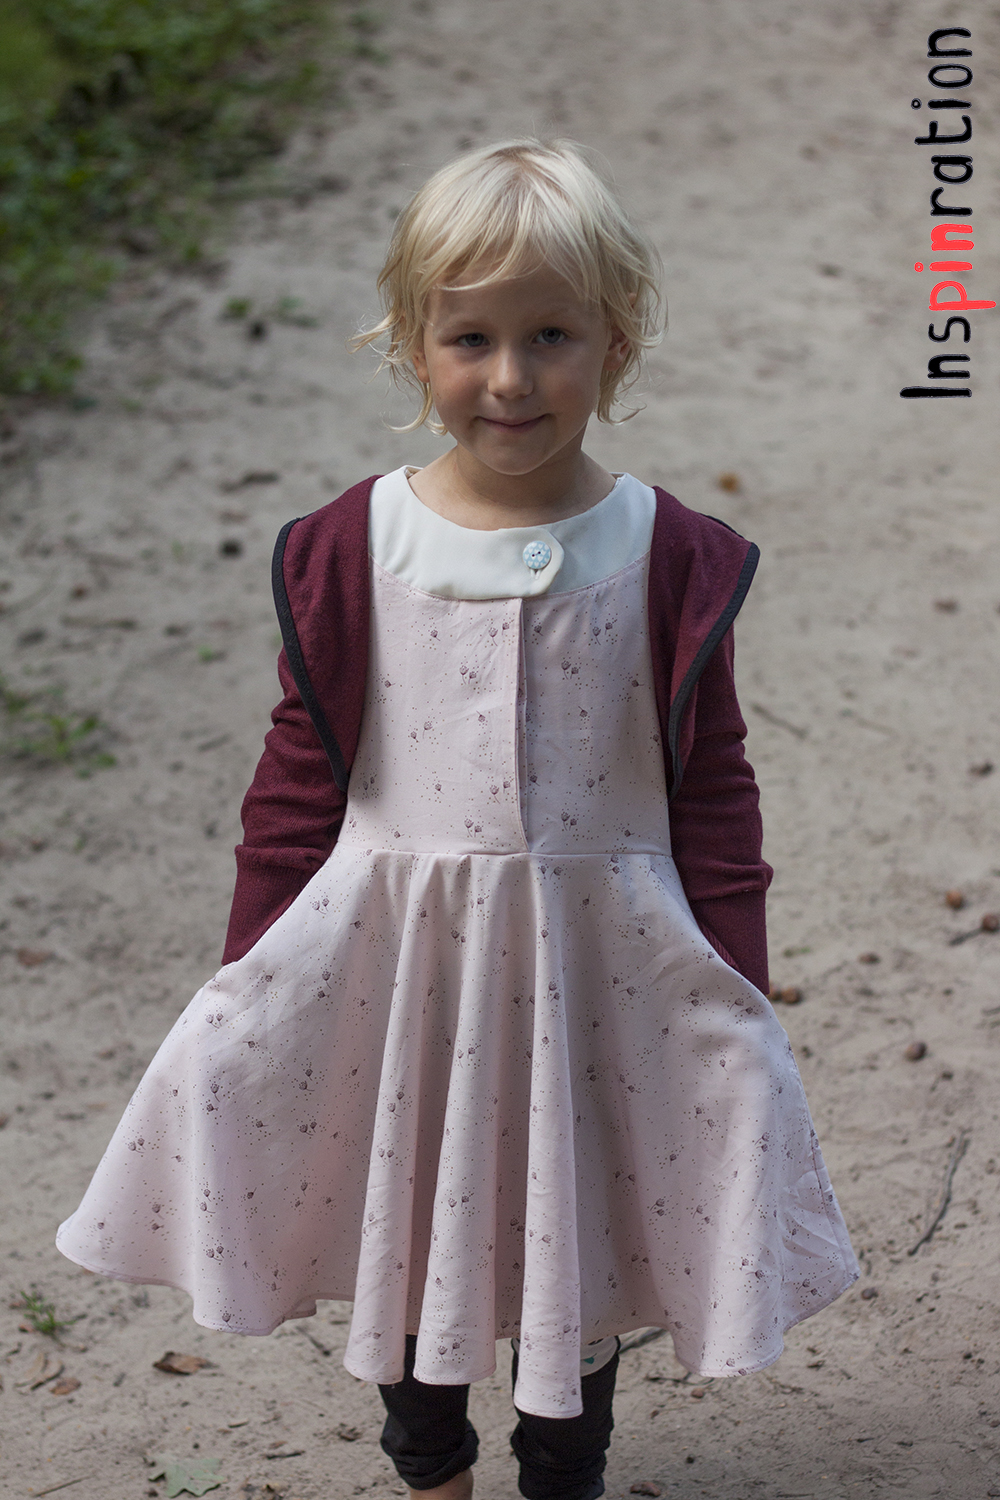
She
wore the dress to a baptism and we made pictures in front of the
church, and my youngest photo bombed the shoot a bit. Seeing all of us
where dressed well, we even made group picture to replace the one on my husband's desk at
work. In the current one, our youngest was just born, so we really
needed a new one. This is not the picture that will decorate his desk, but
the one that shows off the Upton dress best.
Ze droeg de
jurk naar een doop en we maakten foto's rond de kerk en mijn jongste
spring in en uit mijn lens. Aangezien we allemaal netjes waren schoten
we ook meteen een groepsfoto om die op het bureau van mijn man te
vervangen. Die foto was van net na de geboorte van de jongste, dus het
was tijd voor wat nieuws. Zijn foto is iets beter qua lenskijkers, maar
deze foto liet de jurk het beste zien.
I love to hear what you think of my creations. Feel free
to leave a comment in the language you prefer (although Google
translate might have to assist me if you choose something different than
English, German, Dutch or Hungarian).
As you know, I love jersey and I love border prints. Finch Fabrics
brings those two loves together in many of their fabrics. I have bought
several prints in the past and I made this dress, this set and this shirt. This time, I was allowed to test one of the new
fabrics! I got a large piece (well over a meter after washing) to make
into whatever. Until now, I always used relatively small pieces, so this
time, with such a big amount of fabric, I actually made five
pieces.
Zoals jullie weten ben ik dol op jersey en op border
prints. Finch Fabrics brengt deze twee liefdes vaak samen in hun stoffen.
Ik kocht dus al verschillende versies, zo maakte ik deze jurk, dit
pakje en dit shirt. Deze keer was ik echter een van de gelukkige die
iets moois mocht maken van de eerste stukken. Ik kreeg een dikke meter
(na wassen) opgestuurd, dus ik ging helemaal los. Tot nu toe werkte ik
steeds met relatief kleine stukken, dus ik kreeg uit dit grote stuk maar
liefst vijf stukken geperst.
Although I made five
pieces, the main and first
plan was a dress for my youngest. The dress is a mix between the Nivalis*
and Solis*. I made a mix between these two patterns before, and even
wrote a tutorial. For this mix you have to adjust the width of
the Nivalis bodice to the width of the Solis bodice (or else the skirt
will not fit). I also used the height of the (front) Solis bodice to
determine the length I had to cut the Nivalis, to create a bodice. I
made soft pleats, to show off the print of the skirt better. This is my
first Nivalis with collar and I am over the moon that my daughter is not
bothered by it. I love the look.
Hoewel ik vijf stukken
maakte, is de jurk voor mijn jongste het pronk stuk. Dit was het
belangrijkste en eerst stuk dat ik knipte. De jurk is een mix tussen de
Solis* en de Nivalis*. Ik maakte al eerder (een andere) mix en schreef er
toen een tutorial over. Voor deze mix leek me dat niet nodig. Er zijn
twee aanpassingen die je moet maken. Stap 1, knip de Nivalis net zo
breed als de Solis bovenstukken (zodat de rok past). Stap twee knip de
Nivalis vanaf de schouder net zo hoog als het bovenlijfje van de Solis
(gebruik voor het meten de voorkant).Om de tof van de rok zoveel
mogelijk zichtbaar te laten zijn, maakte ik "soft pleats". Dit is de
eerste keer dat ik een Nivalis met krag naaide en ik vind hem echt super
en ik ben heel blij dat mijn dochter er totaal geen last van heeft.
For
my son I made a Semper*, shockingly without alterations. For my middle
one I made a Hibernis*, also straight by the pattern, I know I am still
amazed myself. I wanted to show off how well the main fabric goes with
different colors and prints. I went through my fabric closet and found
several combinations that I wanted to try. My middle daughter got a
sweet style by pairing the fabric with pastel prints. My son a cooler
version, combined with red stripes. I fell in love with the selvages of
this fabric, I just had to use them. In my son's shirt you can see them
on the front piece and on the sleeve bindings. I did not use ribbing,
but jersey for the neckline of the Semper, the neckline is a standing up
because of it.
Voor mijn zoon naaide ik een Semper*, eentje zonder
aanpassingen aan het patroon. Voor mijn middelste dochter naaide ik een
Hibernis*, ook gewoon volgens de instructies, ik sta er nog steeds
versteld van, vast omdat ik te druk aan het spelen was met stoffen
combi's. Ik wilde graag laten zien dat deze stof heel goed combineert
met van alles. Mijn dochter kreeg een lieve versie door de pastel
combi's. Mijn zoon een stoere door de rood met witte strepen. Ik ben
helemaal weg van de mooie zelfkanten van deze stof, ik verwerkte ze
daarom in het shirt van mijn zoon. Zowel in het voorpand, als op de
mouwen komen ze terug. Ik gebruikte geen boordstof voor de hals van de
Semper, maar gewoon jersey. Ik had het beter wel gedaan, want nu staat
de hals een beetje omhoog.
For my eldest, I made a Liv skirt
(free pattern) and a hacked the ADVT*. I had to adjust the
Liv skirt patterns a bit. I wanted as much of the Monster print on it
as possible (the pockets where the bottle neck), and I only wanted one
Monster. I think it worked out rather well. From the last remnants I
squeezed
out an ADVT front, but I added a diagonal on the front. On one hand I
did not have
enough fabric, on the other hand because I liked these shirts a lot. The
back of the skirt is made from the stripes fabric only.
Voor
mijn oudste maakte ik een Liv rokje (gratis patroon) en een aangepaste
ADVT*. Ik moest de Liv wat aanpassen om precies één monster op de
voorkant te krijgen en om geen grote stukken weg te laten vallen achter
de zakken. Van de laatste restje stof perste ik er dus nog een half ADVT
voorpand uit. Ik maakte de schuine streep aan de ene kant omdat ik te
weinig stof had en aan de andere kant, omdat ik nog steeds weg ben van
deze shirts. De achterkant is dus helemaal in strepenstof.
The
fabric is now available through the Finch Fabrics website, but it might also
become soon available through your favorite fabric shop.
De stof is dus nu te bestellen. Dat kan of direct bij Finch Fabrics, of misschien snel bij je favorieten stoffenwinkel.
Feel free to leave a comment in the language you prefer (although Google
translate might have to assist me if you choose something different
than English, German, Dutch or Hungarian). If you buy anything through
my affiliate links (*), I get a small commission (the price stays the
same for you), I am very grateful for everything that feeds my fabric
addiction.
Ik vind het altijd super leuk om reacties te lezen om mijn creaties. In deze post zitten enkele
affiliate linken, aangeven met een *. Mocht je het patroon aankopen
doordat je in de shop kwam via een link van mij, dan krijg ik een kleine
commissie. Het patroon wordt niet duurder voor jou, maar mijn
stoffenkast is er wel heel blij mee.
Challenges, you know I love them. When Davina,
came with the idea of the Sew Challenge, I of course wanted to join. The
idea of the Sew Challenge is that you get three challenges from one
blogger and you give three challenges to another. This way everyone gets
a challenge on her own level. I got my challenges from So Popo Sew,and they
were great. She challenged me to sew something for myself, from La Maison Victor and use uni color(s), three things I do not often (or never) do, but that I should do more often.
Dat ik van uitdagingen houd zal geen verrassing zijn. Toen Davina met het idee van de Sew Challange
kwam, gaf ik me natuurlijk meteen op. Het idee achter de Sew Challenge
is dat je drie uitdagingen krijgt van een blogger en jij voor een andere
blogger drie uitdagingen verzint. Op deze manier heeft iedereen een set
uitdagingen die haar op het lijf geschreven zijn. Mijn uitdagingen
kwamen van So Popo Sew en ze waren super leuk. Zij vroeg me iets te maken voor mezelf, uit La Maison Victor en iets met effen stoffen. Alle drie doe ik weinig, maar zou ik vaker moeren doen.
Although I have only
sewed the Candy and several Martini dresses from La Maison Victor, I
actually own all magazines. So, I curled up on the coach and went through
all of them. After much internal debate, I chose for the Heriette dress
from edition 6, 2015. I googled which bloggers already made the dress,
to get some extra tips about sizing etc. Like a sign, I saw So Popo had
actually was one of ones that posted about the dress!
Hoewel
ik alleen nog maar de Candy en enkele Martini's naaide, heb ik alle La
Maison Victors in de kast staan. Ik vleide mij dus lekker op de bank en
bladerde me suf. uiteindelijk koos ik voor de Hariette jurk uit editie 6 van december 2015. Ik googled vervolgens welke bloggers de jurk al maakte ivm tips qua maat etc. Alsof het zo had moeten zijn, bleek dat So Popo de jurk zelf ook al naaide.
Like So Popo, I went for
longer sleeves. I did a full bust adjustment (explained in the same
La Maison Victor issue). The Hariette officially has many pieces, and
all seams are top stitched. I went a different direction. I did not get
any restrictions on hacking (which I had feared), so I dropped the
waistband and cut the bodice and skirt in one pieces (while keeping the
princess seams). I decided not to top
stitch.
Zoals So Popo ging ik voor een langere mouw. Ik deed aanpassingen ivm grotere boezem aan de hand van de instructies in dezelfde La Masion Victor. De Hariette
heeft normaal gezien heel veel onderdelen en alle naden horen te worden
doorgestikt. Ik paste dat echter aan. Ik kreeg geen hack restricties
(waar ik bang voor was) en liet de tailleband vallen en knipte lijf en rokdelen aan 1 stuk. Dat doorstikken liet ik volledig achterwege.
I did not have any uni fabric coupon in my
closet that was big enough to turn into a dress for myself. I considered
doing a color block, but in the end I just went to the store. I am a
careful cutter, so I usually ignore fabric requirements. I bought 1.75
meter of Punti di Roma at Textielstad and started cutting without
a clear plan. I had so much fabric, I assumed I did not have to
be very careful. I was wrong. In the end I had to add a seam to the
front side panels. They do not bother me though, they are actually a nice detail.
Ik
vond in mijn kast geen enkele lap effen stof waar ik deze jurk uit kon
maken voor mezelf. Ik dacht over een color block, maar ik besloot toch
maar gewoon naar de winkel te gaan. Ik kocht 1.75 meter blauwe Punti di Roma bij Textielstad
en dacht nu zeker ruim voldoende stof te hebben (ik knipt zeer zuinig
dus negeer stof hoeveelheden altijd). Ik waste de stof en begon
vervolgens zonder duidelijk plan aan het knippen, ik had zo veel, een
plan was niet nodig leek me. Fout, uiteindelijk heb ik een naad moeten
houden tussen het lijfje en de rok van de zijpanelen aan de voorkant.
Het stoort me echter niet, best een leuk extra detail zo.
The Sew Challenge was not the only thing Davina
had come up with. She also organized a blog meet, connected to the Sew Challenge to it. This way we would meet the other bloggers in person, and come up with the perfect set of chalenges. So, in the last
weekend of August we had a great meeting with 20 bloggers (with me being
the only Dutch). The evening was filled with good conversation and
goodies! Davina had gathered an amazing amount of gifts, and I took home
some of the best ones. I won a gift card from Madaline for 50
euro, a Compagnie M paper pattern, two pieces of fabric from
Droomstoffen, and several haberdasheries.
de
Sew Challenge was niet het enige waar Davina mee kwam. Om elkaar goed
te leren kennen en zo de leukste uitdagingen te verzinnen, organiseerde ze ook een blog ontmoeting. Op een zeer warme avond in de het laatste weekend van augustus kwamen 20 bloggers samen. Er waren veel leuke gesprekken en super cadeaus. Davina had namelijk een super grote stapel presentjes geregeld en ik ging met een goed gevulde goodie bag naar huis. Zo won ik een bon van 50 euro van Madeline, een bon voor een papieren patroon van Compagnie M, twee stofjes van Droomstoffen en een stapel gave fournituren.
Curious to see
what the other blogs came up? I am one of the last ones to publish this week, so
you can check out most entries already. I actually came up with the
challenges for Margot, and she made something truly amazing. There will be two more weeks of challenges, so it is far from over, check out Davina's blog next week, for even more great outfits.
Benieuwd
wat de rest naaide? Ik ben een van de laatste deze week, dus op het
lijstje hieronder kan je op de meeste blogs hun Sew Challenge al vinden.
Ik bedacht drie uitdagingen voor Margot en zij naaide er echt een super
kledingstuk mee! Na deze week volgen er nog twee weken met uitdagingen,
zorg dus dat je Davina's blog in de gaten houd.
The first week of Project Run and Play season 12 has arrived, and I am a contestant! Today, six bloggers are presenting you their take on Pokémon inspired clothing. We love Pokémon in our house. I played the
game when I was a teenager (almost in my twenties actually) and was
impressed with how fun and still accessible to small kids the game was. I
did not really watched the series, but I did have a poster with the
first 150 Pokémon in my room. Our kids do watch the show.
They had started just before the Pokémon Go app was launched and have
been binge watching ever since (they are only allowed to watch tv after 5 pm until dinner). I did not realize that they are still making the show. Officially there are over 900 episodes, but Netflix
only has the first and last seasons. The human team members of the
latest show where unknown to me until a few weeks ago, but I have grown
to love them (because I follow the show with one ear while cooking).
De
eerste week van Project run and Play, seizoen 12 is gestart en ik ben een participant! Vandaag
laten zes bloggers zien wat zij gemaakt hebben geïnspireerd door Pokémon. Bij ons thuis zijn we dol op Pokémon. Ik speelde het vroeger op
de Gameboy (niet zozeer als kind, eerder als jong volwassene). Ik was
erg onder de indruk hoe een spel zowel simpel, als intrigerend was.
Ikzelf keek niet echt naar de series, maar ik had wel een poster van de
eerste 150 Pokémon. Mijn kinderen kijken wel naar de serie. Ze waren toevallig net
begonnen toen de Pokémon Go app uit kwam. Ik had niet door dat de serie
nog steeds loopt, er zijn al meer dan 900 afleveringen gemaakt! Netflix
heeft echter alleen de eerste en laatste series. Ik kende alleen het
originele team, maar sinds een paar weken ken ik dus ook de nieuwe
karakters (want tijdens het koken luister ik met een half oor mee).
This
week's assignment was to make a Pokémon inspired outfit, so not just
copying the outfit as a costume. First, I wanted to make clothing
inspired by a Pokémon. For all our favorite Pokémon there was already
great inspiration available, so I went a different direction, and chose
one of the human characters. Serena is the first character ever to not
be shocked by Pikachu during their first meeting (totally got that one from Wikipedia),
she does not want to become a Pokémon Master and she drastically
changed her appearance during the series. The new look is really
awesome. It is both sweet and cool, and has many elements that fit my
middle daughter's style (she already has the messy hair style), Serena
therefore became the inspiration for my outfit.
Voor
deze week werden we dus uitgedaagd om een outfit te naaien die
geïnspireerd werd door Pokémon. Geen copy, zoals bij een kostuum, maar
door gebruik te maken van elementen. Eerst wilde ik iets maken op basis
van een Pokémon (zo'n diertje dus en niet een trainer). Ik zag echter
dat er al behoorlijk veel inspiratie beschikbaar was, dus koos ik een
andere weg en ging voor een van de mensen. Serena is het eerste karakter
in de serie die bij kennismaking met Pikachu geen elektrische shock
krijgt (las ik op Wikipedia), ook wil ze geen Pokémon Meester worden en
veranderde ze structureel haar hele look tijdens de serie. De nieuwe
look vind ik persoonlijk echter super leuk. Het is schattig en stoer
tegelijk, iets dat perfect past bij mijn middelste, de haarstijl heeft
ze sowieso al.
Let's start with the dress. The
pink dress Serena is wearing has a white collar (or I think it has, I
spend hours looking through pictures, but I could not really determine
how the white part looks like) and the dress is very revealing (which is
why she is wearing a black top underneath). Either the dress or the
collar seems to close with a blue ribbon. My inspired version is a pink
(with print) dress which has an asymmetrical white yoke. My daughter
isn't a collar kind of girl, so that is why the white got incorporated
in the dress itself. I wanted the dress to open on the front, such that
she can dress herself. I did not wanted visible buttons though, so I
went for a blind button placket. This way there is a separation in the
front, like with the original dress, but it is not revealing. I went for
a circle skirt, which is much longer than the original. Instead of a
blue ribbon, I went for a light blue button.
Laten we
beginnen met de jurk. Serena heeft een roze jurk met een witte kraag en
blauw lint. De jurk is volledig open aan de voorkant, het zwarte topje
dat ze eronder draagt is dus van alle kanten zichtbaar. Ik ging voor een
roze jurk met printje met een asymmetrisch rond wit detail. Mijn
dochter houd niet van kraagjes, dus daarom verwerkte ik het wit op deze
manier in de jurk. Ik wilde graag dat je jurk opent, zodat ze zichzelf
kan kleden, maar ik wilde geen zichtbare sluiting. Ik maakte daarom een
blind knopenpad, zo behield ik ook het gesplitste voorpand van het
origineel. Ik koos vervolgens voor een cirkel rok die een stuk langer
valt dan die uit de serie. Het blauwe lintje inspireerde me tot een
(licht) blauwe knoop.
Serena wears a halter cardigan which
only true function seems to be that it has pockets. I am curious if a
garment like this would work in real life. I went a different direction.
I kept the color, and the fact that it has a different length than the
dress, but I actually went shorter, instead of longer. To make the
bolero an actual practical garment, I went for long sleeves. There is no
way my daughter would wear a hat, so I went for hoodie. I
finished the bolero with black bias. I chose black due to the black
stripe on Serena's hat and the black top. The pockets where transferred
to the dress.
Serena draagt een halter vest waarvan de
functie voornamelijk de zakken lijken te zijn. Ik vraag me sterk af of
zo'n kledingstuk in het echt ook zo mooi zou blijven hangen. In mijn
versie behield ik de kleur en het feit dat de lengte anders is dan die
van de jurk. Ik ging echter voor een kort exemplaar, een bolero. Ook
voegde ik mouwen toe, want de herfst schijnt eraan te komen. Mijn
dochter zou ook nooit een hoedje dragen, dus voegde ik een kap toe aan
de bolero. Ik werkte de bolero af met zichtbare zwarte bias. De zwarte
streep op Serena's hoed en zwarte top zorgde voor mijn kleurkeuze. De
zakken verplaatste ik naar de jurk.
In the
series Serena wears over the knee socks, but with the fall coming, I
thought tights would be more practical. The last piece of the outfit is
therefore a pair of Wild and Free lounge pants, from Coffee and Thread. I slightly adjusted the knee parts, such that it could feature one of Serena's Pokémon. Pancham is a panda like animal, with a spike mohawk
and apparently always has a leave in his mouth. My kids told me he has
to have that leave or else he is not that powerful (missed that
apparently with my one ear).
In
de serie draagt Serena over-de-knie-sokken, maar ik koos voor leggings.
Het laatste stuk van de outfit is een Wild and Free lounge pants van
Coffee and Thread. Ik paste de kniestukken aan, zodat ik er een Pancham
op kon zetten. Pancham is een van Serena's favoriete Pokémon, het is een
panda-achtige soort met hanenkam. De kinderen konden mij vertellen dat
hij per se een blad in zijn mond moest hebben, anders is hij minder
sterk (toch wat gemist met dat halve oor).
For the dress, I used the pink version of See You at Six Dandelion (last week I showed you the blue version). For the white yoke, I upcycled a sleeve from a silk suit. The bolero is made from a large sweater that I bought cheaply with the goal to upcycle. The leggings where made with black jersey (bought at Joyfits).
I drafted the dress as a mix/hack of a dress from her book and
the Theo. The base for the bolero was the Aura*, which I drastically
hacked.
Voor
de jurk gebruikte ik de roze versie van de See You at Six Dandelion
(vorige week liet ik de blauwe al zien). Voor de witte neklijn gebruikte
ik de mouw van een zijde jasje dat op mijn upcycle stapel ligt. De
bolero maakte ik van een herentrui die kocht om te upcyclen, ik vind het
erg lastig om echte mooie gebreide stoffen te vinden (geen tricot
dus). De leggings maakte ik van zwarte tricot (van Joyfits). Ik tekende
de jurk op basis van een patroon uit het boek Stof voor durf het-zelf-vers en
de Theo. De bolero is een sterk aangepaste Aura*.
Be
sure to check out all the entries from this week on the Project Run and
Play page and do not forget to vote which outfit you like best. I of
course hope that I convinced you to try to keep me in the game.
Kijk
zeker even naar wat de andere naaiden, je kan een overzicht vinden op
de Project Run and Play website. Daar kan je ook stemmen op je
favoriete outfit. Ik hoop dat ik jullie overtuigd heb dat jullie gaan proberen mij
volgende week terug te zien.
When
the See you at Six line was released, I immediately ordered a few meter
at the Stoffenmadam (she was kind enough to pick them up for me). I
really love the feel, drape and prints of the new line. I liked it so
much that I wanted some for me as well. But what to make, I wanted
something that would show of the drape of the fabric. When I came across
the Natasha from EYMM I knew I found a match.
Toen de See
you at Six stoffen werden gelanceerd was ik er als de kippen bij. Ik
bestelde bij de Stoffenmadam meteen een paar meter (zij was zo lief om
ze voor mij op te halen). Ik ben helemaal weg van de kwaliteit van de
stof en de printjes. Ik vind ze zo mooi dat er ook iets voor mezelf ging
komen deze keer, maar wat. Ik wilde graag een patroon dat zou laten
zien hoe mooi de stof valt, toen ik de Natasha van EYMM voorbij zag
komen voorzag ik direct een match.
The
Natasha is originally a pattern for jersey, but it works perfectly with
this non-stretchy viscose. I did not have to change anything on the
pattern to make it work with jersey. I did lower the front neck line a
bit though. The pattern is very different from the jersey dresses that I
usually sew. There is a huge amount of fabric that gets its shape by a
belt. This means the dress will keep fitting me even if I loose a few
kilo's (which I am seriously planning). My husband still has to get used
to it a bit, but I think it is a nice addition to my wardrobe.
De
Natasha is eigenlijk een patroon voor tricot stoffen. Hij werkt echter
ook prima met deze mooie viscose, ik hoefde niks aan het patroon aan te
passen. Ik verlaagde wel de neklijn aan de voorkant wat, maar dat had
niks te maken met de stof. Het patroon is echt iets heel anders dan de
aansluitende tricot jurken die ik meestal naai. Het is eigenlijk een
een enorme hoeveelheid stof die vorm krijgt door een riem. Dit betekent
dat de jurk prima blijft passen, ook als ik een paar kilo afval (wat ik
van plan ben). Mijn man moet nog even wennen, maar ik ben overtuigd dat
het een leuke aanvulling op mijn kast is.
The
dress sews up crazy quick. Because of the dolman sleeves there is
actually just two pieces of fabric that you sew together. The elastic
hems take a bit more time, but you can still easily sew the whole thing
in under an hour. I should have spend some time on re-ironing the dress
just before I made pictures though. The fabric wrinkels much less than
normal cotton, but just throwing it on a shelf for a few days was not
the best idea.
De jurk naait super snel in
elkaar. Door de vleermuismouwen zijn het echt maar twee stukken stof die
je aan elkaar naait. De zomen met elastiek zijn iets meer werk, maar
toch zit het geheel in elkaar met een uur. Ik had natuurlijk toch even
meer tijd moeten nemen om de jurk net voor de shoot nogmaals te
strijken. De stof kreukelt eigenlijk helemaal niet zoveel in
vergelijking met een gewoon katoentje, maar een paar dagen op een hoopje
in de kast heeft hem geen goed gedaan.
The kids are back in school and parents and caregivers everywhere are excited to catch up after summer break! Use coupon code PARENTSROCK to save 50% off any adult-size patterns for men* and women* now through 11:59pm PST Tuesday 9/13/2016. This offer may NOT be combined with other offers including bundles.
Met de kids dus weer naar school is er nu speciaal voor de ouders en verzorgers extra korting bij EYMM. Met de code PARENTSROCK bespaar je 50% op alle patronen voor volwassenen in de webshop*! De code is geldig tot en met dinsdag 13 september en kan niet gecombineerd worden met bundels.
Don't miss any of the posts on EYMM's Back to School Tour: Mom's
Edition! (Note: the links below will not work until their scheduled day,
but feel free to click through and check out the rest of their blogs
anytime!)
Feel free to leave a comment in the language you prefer (although Google translate might have to assist me if you choose something different than English, German, Dutch or Hungarian). If you buy anything through my affiliate links (*), I get a small commission (the price stays the same for you), I am very grateful for everything that feeds my fabric addiction.
Ik vind het altijd super leuk om reacties te lezen om mijn creaties. In deze post zitten enkele
affiliate linken, aangeven met een *. Mocht je het patroon aankopen
doordat je in de shop kwam via een link van mij, dan krijg ik een kleine
commissie. Het patroon wordt niet duurder voor jou, maar mijn
stoffenkast is er wel heel blij mee.
Today, I am part of the Maple Skirt Sew along tour. Jess, from
Gracious Threads released the Maple skirt a few weeks ago. She is now
doing a sew along, to show everyone could sew one of these cute skirts.
She invited a few bloggers along to show off the versatility of the
skirt. This is my second Gracious Threads Tour participantship and in
both we were strongly invited to hack, so I think we could actually be
good friends.
Vandaag ben ik deel van de Maple rok
sewalong. Jess van Gracious Threads bracht een paar weken geleden de Maple rok uit en ze organiseert er nu een sewalong voor waarin laat ze
zien dat iedereen in in staat is om deze rok te naaien. Ze vroeg ook
enkele bloggers om het patroon te hacken om te laten zien wat je
allemaal nog meer met het patroon kan doen. Dit is de tweede keer dat ik
met een Gracious Threads tour mee doe en de tweede keer dat we worden
aangemoedigd om te hacken. Ik denk dat Jess en ik het in het echte leven
prima met elkaar zouden kunnen vinden.
The Maple
Skirt is an A-line skirt that
works well entire year round. Seeing the goal of the tour, I decided to
go for an easy hack. Although the technique I used was very easy, I feel
it really adds something to the skirt. Seeing that the technique is not
complicated and it has been already well explained by others, I did not
make a true tutorial. I hope I can still
inspire one of you though.
De Maple rok is een A lijn
rok die je het hele jaar door kan dragen. Gezien het doel van de tour
ging ik voor een relatief simpele hack. De techniek is zelfs so simpel
en reeds eerder uitgelegd dat ik niet eens een eigen tutorial schreef.
Ik hoop echter dat ik toch nog was mensen kan inspireren met mijn post.
I went for improvisational
pin tucks, which was of course clearly inspired by this post. I used
technique two from that post, but I sewed in straight lines. I just
made a fold, which did not overlap with any of the previous tucks and
just sewed a small seam. I first did some pin tucks from top to bottom,
then I added some smaller ones in between. The pin tucks make the skirt
pieces a bit narrower. Therefore I actually cut one size wider than I
should have based on the size table.
Ik maakte kleine
plooitjes op random plekken. Ik was natuurlijk duidelijk geinspireerd
door deze post. I naaide de plooien recht, maar voor de rest is het
precies hetselfde als methode numer 2. I naaide eerst enkele plooien van
boven naar beneden, daarna naaie ik nog enkele plooien ertussen die
maar tot halverwege kwamen. Door de plooitjes wordt de rok iets smaller,
daarom vertrok ik van 1 maat breder dan de maattabel aangeeft.
I
did not
overlap pin tucks and did not to sew one over the side seam, because I
wanted
to avoid bulky seams. I slightly changed the
constructions order. First, I sewed the side seams, than made the
pin tucks. After a few pin tucks I started testing the width of the
skirt against my model and the waistband. I continued making pin tucks
until the skirt fitted my model perfectly. If you follow the same order,
after doing the pink tucks you will put in the stay stitch at the top,
iron on the stabilizer, make the bottom seam and sew on the pockets.
Than you can just continue
with step 7.
Bij mij overlappen de plooien niet en ze gaan ook
niet over een zijnaad. Ik gebruikte namelijk vrij stevige stof en ik
vreesde voor dikke naden. Als jouw stof soepelere is, zijn die
overlappingen wel mogelijk. Ik paste de naai volgorde lichtelijk aan. Ik
naaide eerst de zijnaden en maakte toen de plooien. Na enkele plooien
genaaid te hebben checkte ik de breedte van de rok tegen de tailleband
en op mijn model. Toen ik tevreden was over de breedte. Als je tevreden
bent over de breedte kan je het verstevigende stiksel maken (stap 1), de
vlieseline erop strijken (stap 2), de zomen voorbereiden (stap 3) en de
zakken erop zetten (stap 6). Daarna kan je gewoon verder gaan met stap
7.
Instead of buttons and button holes I used
snaps. Snaps are my go to closure method and I love these flower shaped
ones. Snaps are perfect for people
with button fear and my kids actually prefer them over traditional
buttons. I chose a very contrasting color, but these plastic snaps are
available in almost every color. The skirt looks cool from the front,
but I love the back! When she climbed this wall the bottom snaps,
snapped over, which is much better than you buttons falling off.
Ik
koos voor snaps inplaats van knopen. Snaps zijn tegenwoordig mijn
favoriete sluitingsmethode, zeker deze bloemenversie. Snaps zijn ideaal
voor mensen met vrees voor knoopsgaten, ik ben tegenwoordig over die
vrees heen, maar nu blijken mijn kids snaps fijner te vinden dan knopen.
Toen mijn dochter op een muurtje klop opende de twee onderste knopen,
wat veel beter is dan dat de knopen eraf gevlogen waren. Ik koos voor
een contrasterende kleur, maar er zijn zoveel kleuren dat je ook altijd
wel een matchende kan vinden.
Be sure to check out the entire sew along during the next days on the Gracious Threads blog. If you don’t have a copy of the Maple Skirt yet, you can use the code MAPLESEWALONG for 25% off.
Check
zeker de Gracious Thread blog de komende dagen, daar zullen nog veel
meer variaties van de rok voorbij komen. Mocht je het patroon nog niet
hebben, dan kan je hem nu met 25% korting aanschaffen met de code
MAPLESEWALONG.


