Sunday, September 28, 2014

Project run and play: Denim

Two days before I read about the project run and play themes (denim for week three) I had cut all my old jeans in 15 cm times 30 cm rectangles! I had seen a great quilted jeans cover thought it was a great way to recycle those 20 plus jeans item that were waiting to get repurposed. After seeing the themes I was having a dillema. I was not planning to buy new (denim) fabric but liked to participate in all four weeks of project run and play. While I had been cutting the huge pile of jeans I had already noticed I had far too much for one cover, which is why I decided to take the challenge to sew up something using my rectangles.


The description of the theme gave the impression that I was allowed to use some other fabric and to dial down on the jeans look I added blue/gold flower fabric. I already owned some gold colored snaps which perfectly match the gold in the flower fabric.


I was inspired by the swing skirt of Compagnie M and and asymmetric front from No big dill. I used a bodice pattern piece I had lying around. The skirt is made of 6 jeans rectangles  and 6 flower fabric rectangles (all 15cm time 30cm) and I box pleated the skirt in such a way that the pleats are 10 cm wide. I cut some bias binding from the flower fabric using a tutorial from Melly sews.


Any good dress should stand a good twirl test. This time I finished even before the link up is open, yeah! This leaves me more than a week to make my fourth project.


Thursday, September 25, 2014

Project run and play: upcycle

This is my second contribution to project run and play. Last minute, but I finished it time! I had a trip this week and arrived home yesterday evening but managed to sew up my week two contribution this morning. I made a baby winter onesie from one of my old sweaters. I had seen a few on Pinterest already, but these always used a long sweater. The sweater I had in mind was far from long. The short length was actually the reason this sweater was on my sewing pile. Before my pregnancies the sweater fitted fine, but now it is way to short.


Therefor I had to improvise and the sleeves became the front and back. As you can see on the picture the sleeves were longer than the front and like this I just had enough length. The new sleeves I cut from the front and the back became the hood. The zipper was also recycled.

The sleeve and leg ends were the orginal ends of the sweater and did not needed finishing. The hood is finished with the old neck line. I had to cut the front in two to insert the zipper. The width of the sleeve did not allow me any extra sewing allowance. I widend the front slightly by adding some board of the original back.
The bread was a great way to make her look happy in the camera.
I did not anticipate the bread to have such an effect on the window though.

I think I will make a few more of these!


Friday, September 19, 2014

Fletcher and the Falling Leaves

As Emily pointed out to me, Naptime creations is hosting a sewing series inspired by children books. We read a lot in our house and we love books. We have tons of them but still we regularly go to the library, my kids love it there. They will keep on piling books to take home. When we get home we usually have an immediate reading session in which they prefer to read them all (which sometimes takes a lot of time indeed). My eldest learned to read last year but she still enjoys our reading sessions a lot. reading is so important for kids which is why I love this sewing theme. Books or stories determine the way we look at the world while we are kids but also as grown ups.
 
My link up is inspired by Fletcher and the Falling Leaves. If you do not know them yet, you should check out the book series of Julia Rawlinson about the adorable fox Fletcher. Fletcher experiences the four different seasons in his own way. In the fall version of the book Fletchers becomes very worried when his favorite tree is changing colors and starts to loose his leaves. The books teaches children about nature (the changing of the seasons and the circle of life) and about how change can be scary but also beautiful.


A big part of the dress is made from "fall trees" of JNY, a Swedish organic fabric designer. The trees fabric fits Julia Rawlings book very well because JNY also features this fabric in a winter and spring print (I also own a piece of the winter pint). So both the book and the fabric are really about how trees change over the seasons.


The pattern of the dress I sew my eldest is composed of several (Ottobre) patterns I made in the past. With the help of a tutorial from Kitschy Coo I created a sunset on the front of the dress. The sun is setting but is still visible which also symbolises fall. The fabric I used for the 'sunset' contains different shades of orange circles. When I saw this fabric for the first time it immediatly reminded me of sunsets, during the sunset the sun also changes color. These different colors of the sun resemble the different colors of leaves during fall. Because the dress will actually be worn in the fall I added hood and made sure it has long sleeves. My little photo bomber is there again showing of a shirt I did not blog about.


I really did my best on this dress and tried to match up the fabric near the pockets. I think she looks cute, what do you think?

Thursday, September 18, 2014

Project Run and Play: Candy Candy


This blog post contains a very familiar story (at least I have read it in multiple blogs already). I stumbled upon Project Run and Play a while ago and read through the entire archive. I was very inspired by the designs and tutorials and dreamed about sewing along. I somehow never saw a theme announcement and was amazed how people knew what to sew that quickly.

Shortly after making my resolve to more actively blog about my sewing I did come across the Run and Play announcement themes! The first theme, 80's cartoon, which apparently excited a lot of people, actually scared me of a bit. Cartoon inspired cloths but no costumes, seriously no costumes.... I understood simply copying the cloths to also be in the costume department. I went through several option in my head but nothing really inspired me. I thought of rainbows, flutter sleeves and jumpsuits (looking at what people created I see many had these associations) but the project did not get a real shape in my head.

I had kinda already given up until I saw the first sew along projects coming in and read on Peaches and Bees  that she was also struggling with the theme at first but then just thought about what she watched in the 80's. I watched Candy Candy, according to wikipedia the original Japan show was in the 70's but in the Netherlands it was on television in the 80's. I have to admit that my most clear memories of the show is the bed spread I got (and still own) and a girl crying on a boat, but looking through the pictures of the show this week I found my inspiration. I loved the idea of a red apron dress and I immediately knew how to do it.


Last December I bought the Amaryllis dress pattern, because I simply had to have it. I had had several ideas on which fabric to use for it but the dress had not been made (or printed for that matter). I thought that if I would flip the back and the front of the dress, use two colors of fabric (one for each side) and  add a faux apron front I would have a pretty good apron style dress. I used two pieces of left over fabric, a sheet and a piece of red canvas like fabric that I once bought for making  pipping (this was at the start of my sewing adventure and had no idea how much I would need and just bought way to much. The red fabric was used totally, I even had to cut the circle skirt in three piece to make it fit. The front strings of the apron turned out a bit tight to turn, those two strings took more than an hour to turn!! I did not wanted to line the dress and that combined with my own adjustments did lead to a view construction confusions, but I am done with even some time to spare! Al in all I am satisfied with the result, I added some flutter sleeves because that seemed fitting with the whole theme.

No racoons here in the Netherlands (Candy Candy's pet) so my daughters favorite plush animals had to substitute.

 The red heart button came from my stash as well, the red and white match perfectly.


I assumed correctly that this dress would have a high spin factor, while spinning the fake underskirt shows, yeah! 


Monday, September 15, 2014

Sewing on skirts

A few weeks ago I made four bodies for my youngest in one batch. I used a pattern I had used before just two sizes larger. I felt confident enough to not first make one, I should have known better... While sewing I was surprised that the back of the body piece was not longer than the front. This had been the case with two sized smaller but I decided that the bigger size asked for a different snit. After finishing the neck line I felt the back was relatively low, but I assumed that I had not stretched my binding enough while sewing it on. It turned out that the body pattern I used had two different fronts and I had confused the back piece with the second front!

Okay after breathing in very deeply a few times I put one of the bodies on an existing one and saw that the total length should at least be enough for now. I was planning on making bodies that would be good for a few months but at least they would fit now. I started putting on snaps and was confronted with a next problem.
I made the bias extra thick because I felt that the snaps needed a bit more fabric between them. But I had become over enthusiastic apparently because the snaps did not wanted to stay on. After putting on around 15 snaps I was managed to make 8 snaps stick. When actually putting on a body I found out that the fabric I used for two was not as stretchy as I was used to, making the body hard to put on. You can probably imagine how I felt about the body adventure (and I did not even mention the fact that even later it turned out that the back of one of the bodies had a weave mistake which created two small holes)...

I managed to not throw them all out (although the 8 snaps that staid on came off again). After sharing my disaster project with my niece she suggested to just cut them to shirts. I light bulb went on in my head and I remembered something I pinned a while back.
The pin was about putting a skirt on a too small body. This is what I did to two of them that were made with stretchy (scrap) fabrics. My three year old now loves her new dresses, although they are a bit tight. I should put them in a box for a year for my youngest but I have not managed to do this because my three year old fishes them out of the clean laundry pile all the time while sorting it. In the pictures she wanted to show of her new "phone" she had just got and did not wanted to part from. It is still in her hand in the second picture but it is just outside the image.

I used my newly acquired trick of putting on a skirt to safe a friends daughters shirt. The friend wanted to donate the shirt (because it had become to shirt) to my daughter and mentioned her daughter loved the shirt. I decided to try the trick again and combined it with a skirt that was also on the "put away"pile.


Wednesday, September 10, 2014

Faux bolero dress tutorial

Two posts ago I showed a hand drafted pattern featuring a faux bolero. In this post I would like to show you how to make such a faux bolero in jersey/knit based on an existing bodice back pattern. This is my first sewing tutorial, if something is not clear please let me know.

I have sewn most of the dress on my lock machine, but you can do this also with a regular sewing machine. Matching up the thread to your bolero is advisable but not crucial. I simply do not own red serger thread and just used white, when the dress is on this does not show.


Use your favorite knit dress pattern or draw a pattern based on an existing dress or T-shirt (many tutorials on the web to help you with that). Start out with the pattern of the back piece (the one with a high neck line). Draw on your back piece a front neck line. I did it in green (just ignore the purple, I often reuse my patterns). While drawing the front neckline  make sure that the shoulder is less wide, the difference should be a bit more than your sewing allowance.


On the same back piece also draw the blue line you see in the picture below. The blue line start at the shoulder end of the back piece and approximately keeping the same distance goes down and curves under the arm. The second purple line is for the red stripe I added in this version of the dress. The pattern I used is based on a pattern from Ottobre 4/2013. It is up to you if you would like a stripe in the middle or any other details you are used to include.


Now draw and cut two extra pattern pieces based on the lines you added on the back piece you started out with.


Cut your fabric (the extra shoulder pieces twice). Besides all the pieces for bias etc you will als need a long strip which will be part of the faux bolero front. My strip was about 15 cm wide and 80 cm long. The strip will have to go along side the extra pieces and the back neckline. I made sure the piece was surely long enough without actually measuring it.  After cutting your pattern pieces should line up like this. Be sure that the shoulders of the main front piece are indeed less wide than the shoulders of the back piece and that the extra front pieces on the shoulders are as wide as the back piece.


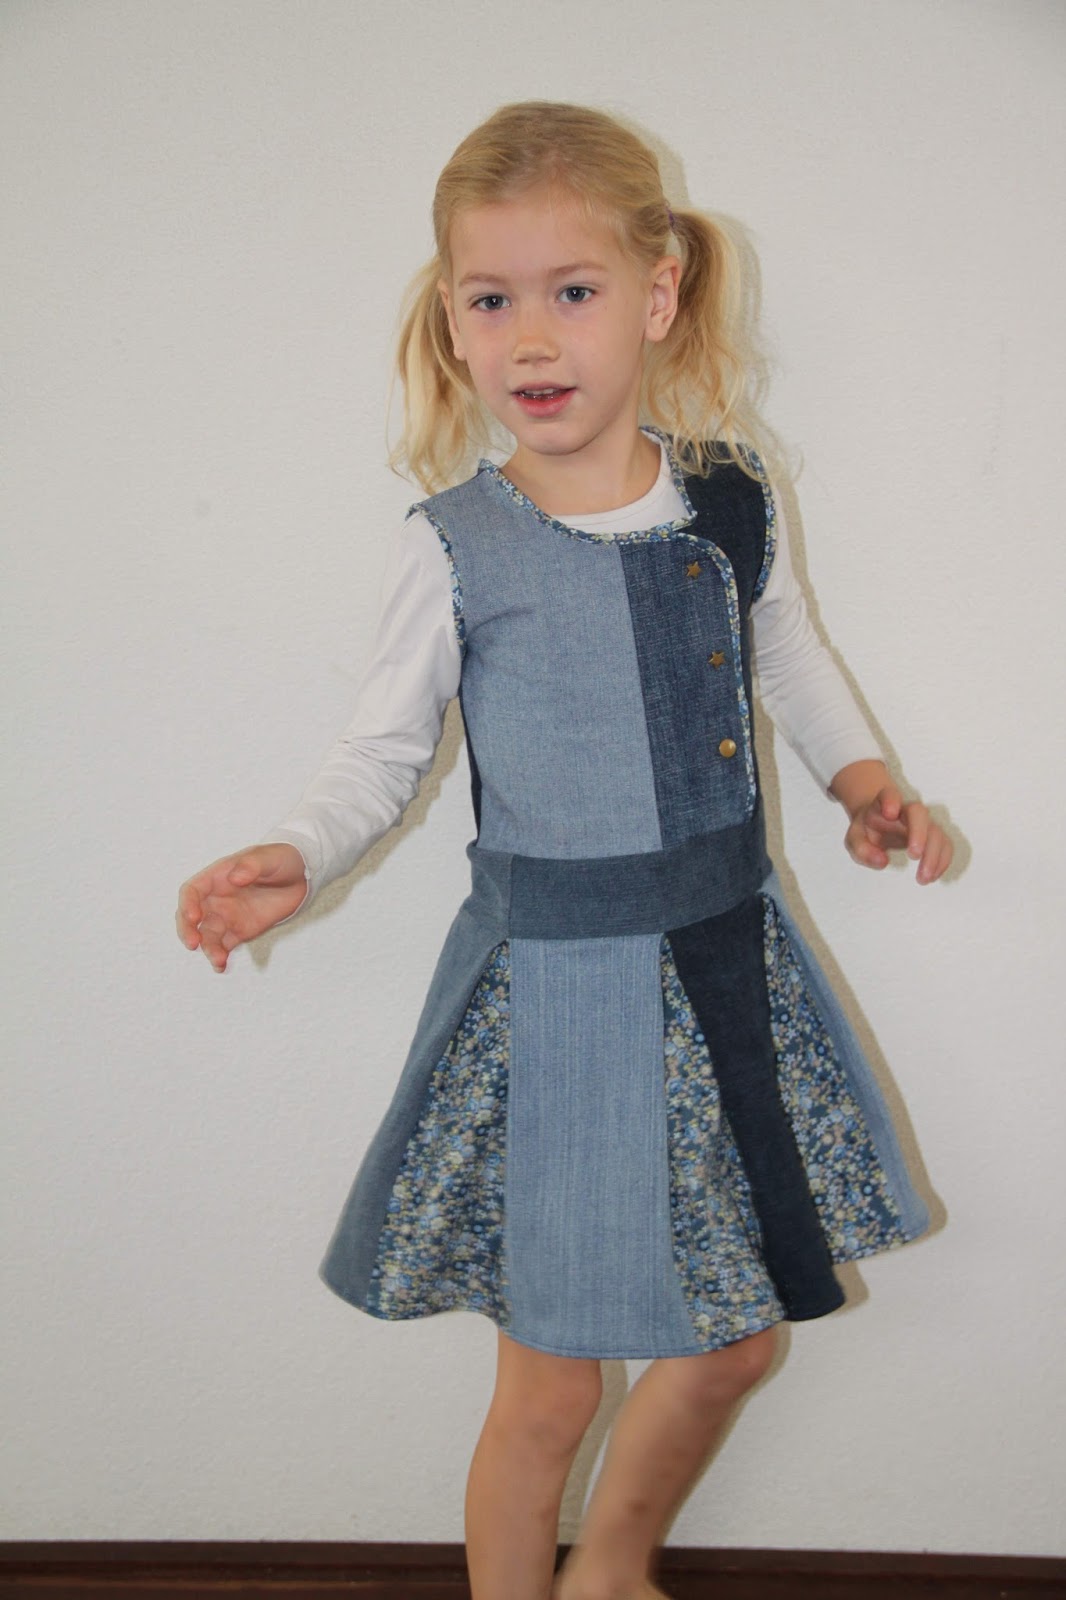
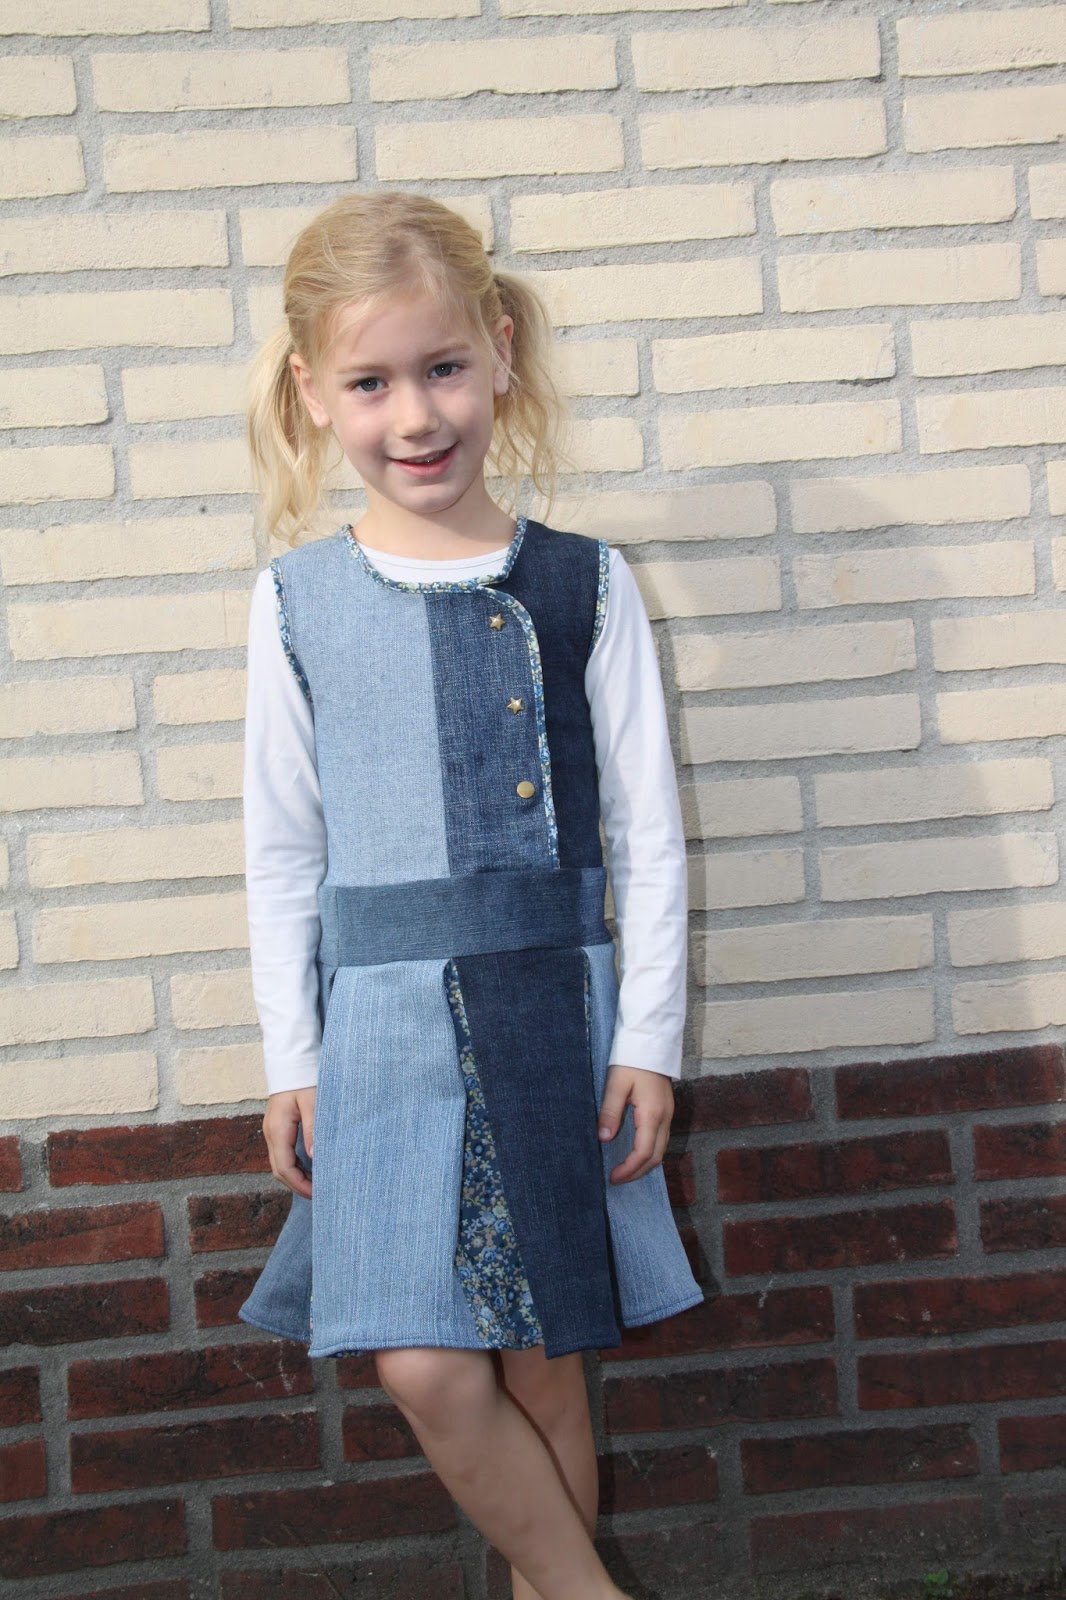
I made the dress in such a way that the back of the dress has the color of the bolero until the bottom line of the red block in the front. I think this enforces the bolero feeling, but you might have different ideas about this.

Finish the front neckline and sleeves as you are used to. I put a knit bias on the neckline and a piece of double folded knit on the sleeves.


Lay down the main front piece, put the extra shoulder pieces on it in the right position (all good sides up).


Put the back piece on it with the back side of the fabric on top. The good sides of the main pieces should be facing each other (with the extra pieces in between). Sew the shoulders together. Make sure that you sew through all three layers. You will run out of front shoulder but just keep on sewing the extra front pieces to the back piece.

Now take the long strip of fabric and sew it in one motion to the extra front pieces and the back neckline. Do not start too close to the side of the strip, just leave a centimeter hanging free (this will makes the final stitching in place later easier) Start on one side and do not stretch the long strip. The first time I made this I thought that I had to stretch it like a bias, this turned out bad. If you would like to stretch something, stretch the extra front pieces, but it works fine without stretching any of the pieces.


I prefer to now put in the sleeves.


If applicable put on the extra piece in the front.


Fold the top right sides out and if necessary you can now easily cut the back and front exactly the same size to make sure the sides will match up. Then sew on the the skirt pieces. I also added some pockets to the dress in this stage.


Now fold the dress right sides out. Make sure that the seam of the bolero piece is up (just look closely to the picture then you see that the entire long strip is lying flat) this will help with the right folding.
 

Now align the extra front pieces to the main front piece and fold up the long strip a bit more than half (about 2/3). In my picture the long strip end of fabric now falls besides the main front piece,  with your own project the piece falling besides the front might be bigger or smaller. In the beginning I mentioned not to start sewing at the beginning of the strip, that was to make this step easier. If you are satisfied with how the bolero is folded turn the dress inside out. Re-pin your side and sew them together. If you use a lock the overhanging piece will be cut of automatically (just cut it with a pair of scissors if you use a regular machine)


 Finish the bottom of your dress, iron the bolero collar and you are done. If your collar keeps turning a bit and showing the seam just put a few stitches by hand on the inside.


 The dress is a gift for a sligthly bigger girl but my daughter could model it.


I hope you liked it. Please let me know if anything is unclear or if you used the tutorial. I would love to hear from you.